

It used to be easy- there was an option in embed to “Start video at”
and it was easy to custom pick sizes using the old embed code.
I wanted to start a video at 39:27 in- so I had to multiply 39x 60 + 27 to come up with 2367 seconds
Copy the standard embed code: (I’ve removed starting and ending brackets)
iframe width=”640″ height=”360″ src=”//www.youtube.com/embed/6U5z19pvCbA” frameborder=”0″ allowfullscreen></iframe
Then put this on the end of the video url “?start=2367?:
iframe width=”640″ height=”360″ src=”//www.youtube.com/embed/6U5z19pvCbA?start=2367” frameborder=”0″ allowfullscreen></iframe
Voila- it starts at the right time.
“I keep getting emails from my new site, why?” is a frequent question from new site owners. The emails usually format [Your Site Name] Comment: “Post title”
This usually means either you’re popular, or spammers have found you. Depending on your settings, you could get these emails right away, daily, weekly, or not at all. To us here at Websitetology, these are an indication that your site is working, if they are real comments- and it’s your job to respond as soon as possible. Some people believe they should approve all comments before posting- which is a mistake in our book. Heated conversations, great support insight, good news, all could be sitting in the queue piling up, while you were asleep- or even in a movie. Our choice is to let them fly- moderate as soon as possible.
The emails could just be notifying you of comments posted- but some will ask you to moderate, and this is what this post is about.
Who ends up in moderation is all covered in the Settings > Discussion part of your dashboard. I don’t make people register, only requiring name and email address to be able to comment, so as not to make it too difficult to contribute. There are lots of other options, but covering all of them would make this a very long post.
They contain the following info:
New comment on your post: “Post title”
Author: with the name that that the commentator typed in. (IP. address)
E-mail: the email that the author typed in
URL: A site address that will show up as a link- if they have a site of their own.
Whois: a link to whois.arin.net which may tell you where the person was accessing your site.
Then the comment.
Underneath will be “You can see all comments on this post here:” with a link to your post and all the comments
Permalink: link- a link to the exact comment (which has a unique URL if you click on the time/date stamp of each comment if you are accessing it from the site’s front end)
Trash it: a link to take you to comment moderation to delete a comment.
Spam it: a link to take you to comment moderation to mark it as spam.
How to tell SPAM from real comments?
There are several things I look at right away:
- Does the name seem legit. For some reason spammers often use names that sound odd- or unique. This is the first clue.
- Is the IP from one you recognize- or is it a US based url? A lot of spam is from other countries or odd ISP’s You can always click on the Whois link to learn more
- Does the email address seem legit? If it’s some odd combination of letters and numbers, or something you wouldn’t tell someone for an email address it’s not. I make it mandatory to enter an email address in comments, but that doesn’t stop people from typing in [email protected] etc.
- If the URL is to an unrelated commercial site- for viagra, cigars etc. you can almost guarantee it’s spam unless your site is about E/D or smoking. Click to see where the link takes you and you’ll know what their intention is, or hover over the url- in the comment moderation page, and you can preview the site without risking a visit (see illustration below). Note, most people won’t put a link to a specific page or post- but just the URL ie. www.websitetolgy.com not www.websitetology.com/make-your-site-into-a-money-machine.
- Content is the key- if they are just saying how much they like your site- delete or spam. Comments are to add to the discussion or create additional value. Trust me, no one comments on your post and says “I’m so glad I found this site. I’m going to bookmark it and visit often” on a post from a few months ago. That’s a random spammer. Also, if the grammar is bad, or the comment has nothing to do with the post- spam it.
- For some odd reason, the WordPress comment moderation page shows all the spam full length instead of truncating it with a read more tag. When scrolling past some monster spam comments with hundreds of links, I wonder what the core team is doing. I don’t need to see the whole spam comment to recognize it- we hope to release a plugin to fix this.
There are all kinds of comment moderation tools as your site becomes more popular. Logging in with other social media ID’s can help considerably, but try to always have a way that people can login without having to use Twitter or Facebook. Social Login Plugin can help. There are also tools like Intense Debate and Disqus that can help thread and moderate comments via the community. Note, Intense Debate which was bough by Automattic (the people who make WordPress) has ceased development, and here is an interesting discussion about why not to use Disqus by a former user.
You’ll also get trackbacks- which can be SPAM. Trackbacks are notifications that post like comments on your site, but are just links to other sites that have linked to your post. Some people don’t allow comments, only trackbacks, so that they don’t have to be bothered with dealing with their community. Seth Godin who has millions of readers runs his site like this. It’s a very one-directional, arrogant way to run a site in the days of the social web, but, it’s up to you how you want to deal with your community. Trackback spam can be a big pain in the butt, but usually it means you are doing something right- or they wouldn’t value a link from your site so much.
A good way to determine if a trackback is spam- without going to the site, is using the preview in the comments moderation page. Hover over the link- and a preview will show you what your readers would see if they clicked on their URL.
Here’s a screenshot:
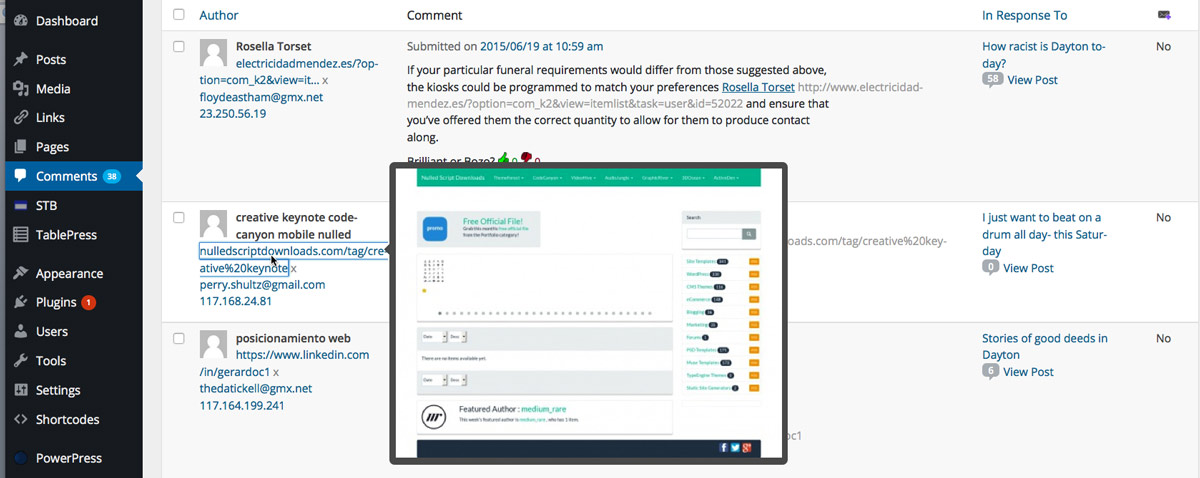
By hovering over the link, you can see the site that the spam comment author is linking to.
But the best part of moderating comments is…
Responding to comments on the site. Have the conversation with the person who took the time to read and comment on your site.
Everyone who comments is starting a conversation with you, engage and enchant and you’ll be well on your way to becoming a trusted expert in your field.
Helpful links on the WordPress interface for comment moderation:
Found this article explaining the WordPress moderation interface: Learning to Love Comment Moderation by Heather R. on the WordPress.com site. It explains the interface, although the action menu only appears on mouse over in current versions- an odd UI that isn’t entirely intuitive.
A Guide to WordPress Discussion Settings by Craig Grella on WPMU site fully explains the discussion settings in the Dashboard>Settings>Discussion
and there is a whole section on the WordPress Codex: Comments in WordPress
And here is a video from WordPress to show you the quick view of recent comments on the Dashboard and how to moderate from there:
Making a playable audio player used to mean you had to embed a Flash player or a Quicktime file into your website. Luckily, now there is a way to add a simple HTML5 code that will not only play the audio file, but will create a player that the user can control. You will want to use HTML5 over Flash because many of your readers will be using a mobile device, and not all mobile devices are flash-enabled. We will, however, create a Flash player as our fallback in case a browser cannot handle HTML5 in this tutorial. You can also use a Quicktime file as the fallback, but keep in mind you will have to convert the file to an .mov.
The HTML5 audio and video tags make embedding files easy, and eliminates the need for the embed and object tags. As easy as they are, however, they have a few quirks that we need to fix. Some browsers, like Firefox, can’t play .mp3 files through the player. However, Firefox can play .ogg files, which browsers like Google Chrome cannot play through the HTML5 audio tag. We’ll need to upload and embed both of these files. The browser will only display the audio file it can play, so there’s no need to worry about having two audio players in your post.
Here is the final code that we will be using. This will include 2 versions of the audio files (mp3 and ogg), as well as a flash player as the fallback for browsers or devices that can’t handle HTML5.
<audio controls="controls">
   <source src="yourURL.mp3" />
   <source src="yourURL.ogg" />
<!-- fallback -->
<embed type="application/x-shockwave-flash" flashvars="audioUrl=yourURL.mp3" src="http://www.google.com/reader/ui/3523697345-audio-player.swf" width="650? height="0? quality="best"></embed>
</audio>
If you prefer, you can simply add text as the fallback. Here is what this code will look like.
<audio controls="controls">
   <source src="yourURL.mp3" />
   <source src="yourURL.ogg" />
<!-- fallback -->
Your browser cannot handle HTML5.
</audio>
*Note: It is STRONGLY recommended that you use the Flash player as the fallback